
Find instructions here for tailoring your widget to your brand...
- Selecting a theme colour
- Customising your banner
- Setting section images and descriptions
- Setting event Images and descriptions
- Setting promo images
- More advanced settings
Setting your widget colour
Your widget will adapt around your theme colour. The theme colour will be used for highlights and action buttons. It will also be used to inform your banner colour (if you dont have an image set). An automatic pallette will be generated around your chosen colour to give variety to section background colours and ensure accessbility is maintained for all your guests by adding contrast automatically.
In the below example the Restauarant selected an orange theme colour of #ff9100. This does not provide enough contrast for accessibility so it the banner automatically adjusts it. You can still override the banner background colour (refer Customising your banner) and section colours (refer Setting section images and descriptions).

Setting your widget colour
To set this up, first navigate to Admin > Booking Widget > Widget Generator
Select your chosen colour and save.

You can also update the background colour (including making it transparent) used when linking from or embeding on your website. See More advanced settings.
Customising the display of your Widget Banner

Your widget banner is beautifully customisable, with several options to tailor it to your branding.
Selecting your banner image
When selecting a background image for your booking widget banner. We recommend selecting an image of 1024px - 1489px width for best results. Please note your booking widget is responsive so it will render the image differently on desktop and mobile. The horizontal centre line of the image will always be visible. The image will then scale to the full width of the device. The maximum height of the visible section of the image will be 320px on desktop, and 250px on mobile.
We recommend an image size of 1489px x 900px

Adding an image to your banner
To set this up, first navigate to Admin > Booking Widget > Widget Messages
For each of your desired settings, simply add the following blocks into to the "Day Closed" area. Dont worry these wont appear in your actual "Day Closed" message to your guests.
Background image
<!-- [banner|IMAGE URL]-->
In the above example
- Replace "IMAGE URL" with an image URL already hosted on your website.
e.g. <!-- [banner|https://yourimageurl.com/image.jpg]-->
Hint: If you dont have an image you can change the section tile colour using the following tag and setting a hexadecimal colour code.
<!-- [banner-color|HEX COLOUR CODE]--> e.g. <!-- [banner-color|#aeaeae]-->
Other banner customisations

You can also make other changes to your banner
Change the size and dislay of your logo and hide the venue name (1)
<!-- [banner-logo-bg|#aeaeae] [banner-logo-height|-55] [banner-logo-no-radius|true] [banner-logo-hidden|true] [banner-venue-name-hidden|true] -->
Set a cuisine type (2)
<!-- [type|Italian Dining] -->
Set a heading (3)
<!-- [heading1|Come for Dinner]-->
Set a subheading (4)
<!-- [heading2|Stay for the feeling] -->
For more customisations, or to build the code you need see More advanced settings.
Hide the banner
To hide the banner completely use this code in the closed day field.
<!-- [banner-hidden|true] -->
Customising the display of your Sections
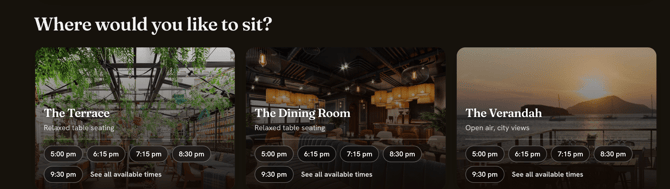
If you allow customers to select a section on booking, each of your bookable sections can have an image and description. This will be used on the booking time selection page if more than one section exists. It will also be used on the booking details page.
Selecting Section Images
For best contrast against text, we recommend darker images for sections. Images generally display at 328px width x 236px height on the web. On mobile devices they become responsive and the height changes to 188px, which means the top or bottom of your image may be cropped. We recommend an image size of 800px x 450px for best results.

Adding an image or description to your widget
You will need to add some information to the description of services on each daily schedule.
To set this up, first navigate to this you need to go to the Diary > Settings > Schedules > Select a day > Select one of your services
For each of your sections, simply add the following in to the service description area. Dont worry these wont appear in your actual description to your guests.
<!-- [section-image|SECTION NAME|IMAGE URL][section-description|SECTION NAME|YOUR DESCRIPTION]-->
In the above example
-
Replace "SECTION NAME" with the exact name of the section that you want the image or description to show for, e.g. "The Terrace".
-
Replace "IMAGE URL" with an image URL already hosted on your website.
-
Replace "YOUR DESCRIPTION" with an image URL already hosted on your website.
e.g.
<!-- [section-image|The Terrace|https://yourimageurl.com/image.jpg][section-description|The Terrace|Relaxed table seating]-->
Repeat this for each of your sections. You only need to do this for one service per day and the settings will repeat automatically for all services that day. You can alternatively set different images and descriptions for sections in different services.
Hint: If you dont have an image you can change the section tile colour using the following tag and setting a hexadecimal colour code.
<!-- [section-color|<SECTION NAME>|<HEX COLOUR CODE>]--> e.g. <!-- [section-color|The Terrace|#aeaeae]-->
Expanding Description
To expand the description on your widget without users having to select "see more", go to Diary > Settings > Schedules > Select a day > Select one of your services add code:
<!-- [expand-description|true] -->
Customising the display of your Events
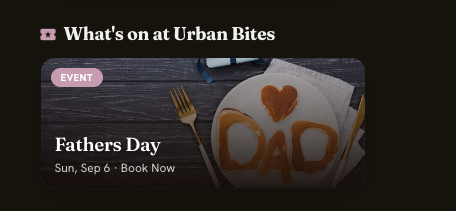
Below is an example of an event shown on the main booking page with a banner image and button description.
Below is an example of an event page with a banner image.
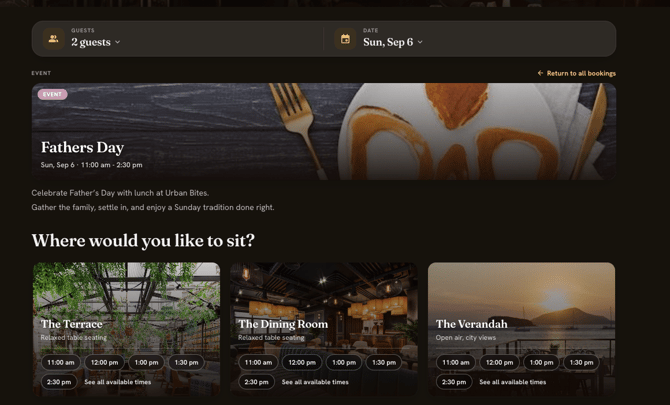
Each of your events can have a bannerimage and banner description. This will be used on the normal booking time selection page and the event bookings page.
Selecting Event Images
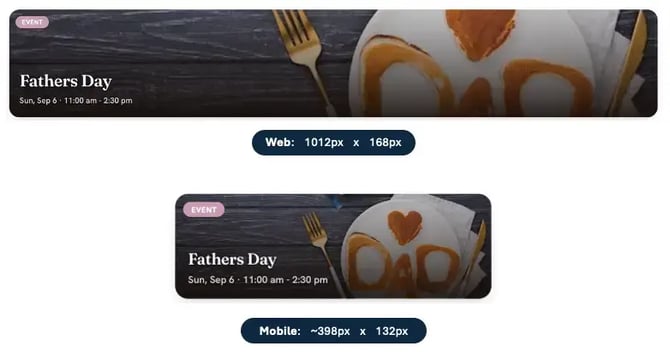
For best impact, event banner images should be 600px width and 350px height. They will be cropped to 1012 x 168px on the web. Please note however on mobile devices they will become responsive and will be cropped to the screen width and 188px height. So some edges of the image may be lost depending on the device size.
Adding an image or button description to your event
You will need to add some information to the description of services on each daily schedule.
To set this up, first navigate to Diary > Settings > Schedules > Select a day > Select one of your services
Top Tip: As described above you should also add section images and descriptions here as required for sections available on the event.
Add the following for your event
<!-- [event-image|IMAGE URL][event-description|YOUR DESCRIPTION]-->
In the above example
- Replace "IMAGE URL" with an image URL already hosted on your website.
-
Replace "YOUR DESCRIPTION" with an image URL already hosted on your website.
e.g.
<!-- [event-image|https://yourimageurl.com/image.jpg][event-description|Special limited offer]-->
Hint: If you dont have an image you can change the event tile colour using the following tag and setting a hexadecimal colour code.
<!-- [event-color|HEX COLOUR CODE]--> e.g. <!-- [event-color|#aeaeae]-->
Adding Promo images
You can add promo images to your booking widget. These will appear on the booking widget for a given day and service.
Below is an example of a booking page with a promo image for pasta night.

Promos are display only and cannot be clicked. You can set multiple of them and the widget will automatically loop through them.
Selecting Promo Images
For best impact, promo images should be 328px width and 236px height. Please note however on mobile devices they will become responsive and will be scaled to the screen width and 188px height

Adding promo image(s)
You will need to add some information to the description of services on each daily schedule.
To set this up, first navigate to Diary > Settings > Schedules > Select a day > Select one of your services
For each promo image you want to display, simply add the following in to the service description area. Don't worry these wont appear in your actual description to your guests.
<!-- [promo|<IMAGE URL>]-->
In the above example
- Replace "<IMAGE URL>" with an image URL already hosted on your website.
e.g.
<!-- [promo|https://yourimageurl.com/image.jpg]-->
Repeat this for each of your promos. You only need to do this for one service per day and the settings will repeat automatically for all services that day. You can alternatively set different images in different services.
Advanced Settings
You can access full documentation and customisation options, including instructions for embedding your widget into your website via your bespoke documentation page.
Navigate to Admin > Booking Widget
Select the dropdown beside Booking Widget and select Booking widget example
